Securing Modern Web Apps: Password Hashing, RBAC, OAuth 2.0, and OpenID Connect Explained
Securing Modern Web Apps: Password Hashing, RBAC, OAuth 2.0, and OpenID Connect Explained
TL;DR: Authentication and authorization are distinct problems, and solving them well requires different tools. This article walks you through password hashing with bcrypt, role-based access control (RBAC), OAuth 2.0's delegated authorization model, and how OpenID Connect layers identity on top of OAuth — with real code, architecture diagrams, and production-ready patterns.
Introduction
How does a website know who you are?
It is a deceptively simple question. The answer touches cryptography, protocol design, distributed systems, and organizational policy all at once. Get it wrong and you end up in the company of LinkedIn (2012, 117 million bcrypt-less MD5 hashes), RockYou (2009, 32 million plaintext passwords), or Uber (2022, social-engineered MFA bypass). Get it right and your users can trust you with the most sensitive corners of their digital lives.
This article is for developers who are building or maintaining web applications and want to move beyond "just add JWT" advice toward a genuine mental model of how secure identity systems are designed. You should already be comfortable with HTTP, databases, and at least one server-side language. Cryptography will be kept conceptual — we will not derive SHA-256, but we will understand why bcrypt is a better choice than SHA-256 for passwords.
We will build our understanding in layers:
Password storage — how credentials are protected at rest
Authentication vs. Authorization — two distinct problems
RBAC — modeling who can do what
OAuth 2.0 — delegating access without sharing passwords
OpenID Connect — layering identity on top of OAuth
Modern architecture — how these pieces wire together in production
Why Application Security Matters
Security failures are not theoretical. The 2019 Capital One breach exposed 100 million credit applications due to a misconfigured WAF and overly permissive IAM role — a pure authorization failure. The 2013 Adobe breach stored 153 million passwords encrypted with 3DES in ECB mode and the same hint for every password, which meant cracking one revealed the plaintext for all identical passwords. These are not exotic zero-days; they are failures of basic security hygiene.
The costs are concrete:
Regulatory fines: GDPR Article 83 allows fines up to €20 million or 4% of global annual turnover.
User trust erosion: 81% of users stop using a service after a breach (IBM Cost of a Data Breach 2023).
Engineering remediation: Average breach cost in 2023 was $4.45 million.
Note: Authentication answers "Who are you?" Authorization answers "What are you allowed to do?" Conflating these two problems is one of the most common sources of security vulnerabilities.
Password Hashing and Storage
Why Plaintext Is Unacceptable
Storing passwords in plaintext means a single database breach exposes every user's credentials — and because most users reuse passwords, you have now compromised their email, banking, and social accounts too. Encryption is also insufficient: if your encryption key is compromised, all passwords decrypt instantly.
The correct approach is one-way hashing: transform the password into a fixed-length digest that cannot be reversed. But not all hashes are equal.
Why MD5 and SHA-256 Are Wrong for Passwords
General-purpose hash functions like MD5 and SHA-256 are designed to be fast — billions of operations per second on modern GPUs. That speed is your enemy when an attacker is brute-forcing a leaked hash database. A single RTX 4090 can compute ~164 billion MD5 hashes per second. An 8-character lowercase password falls in under a second.
How bcrypt Works
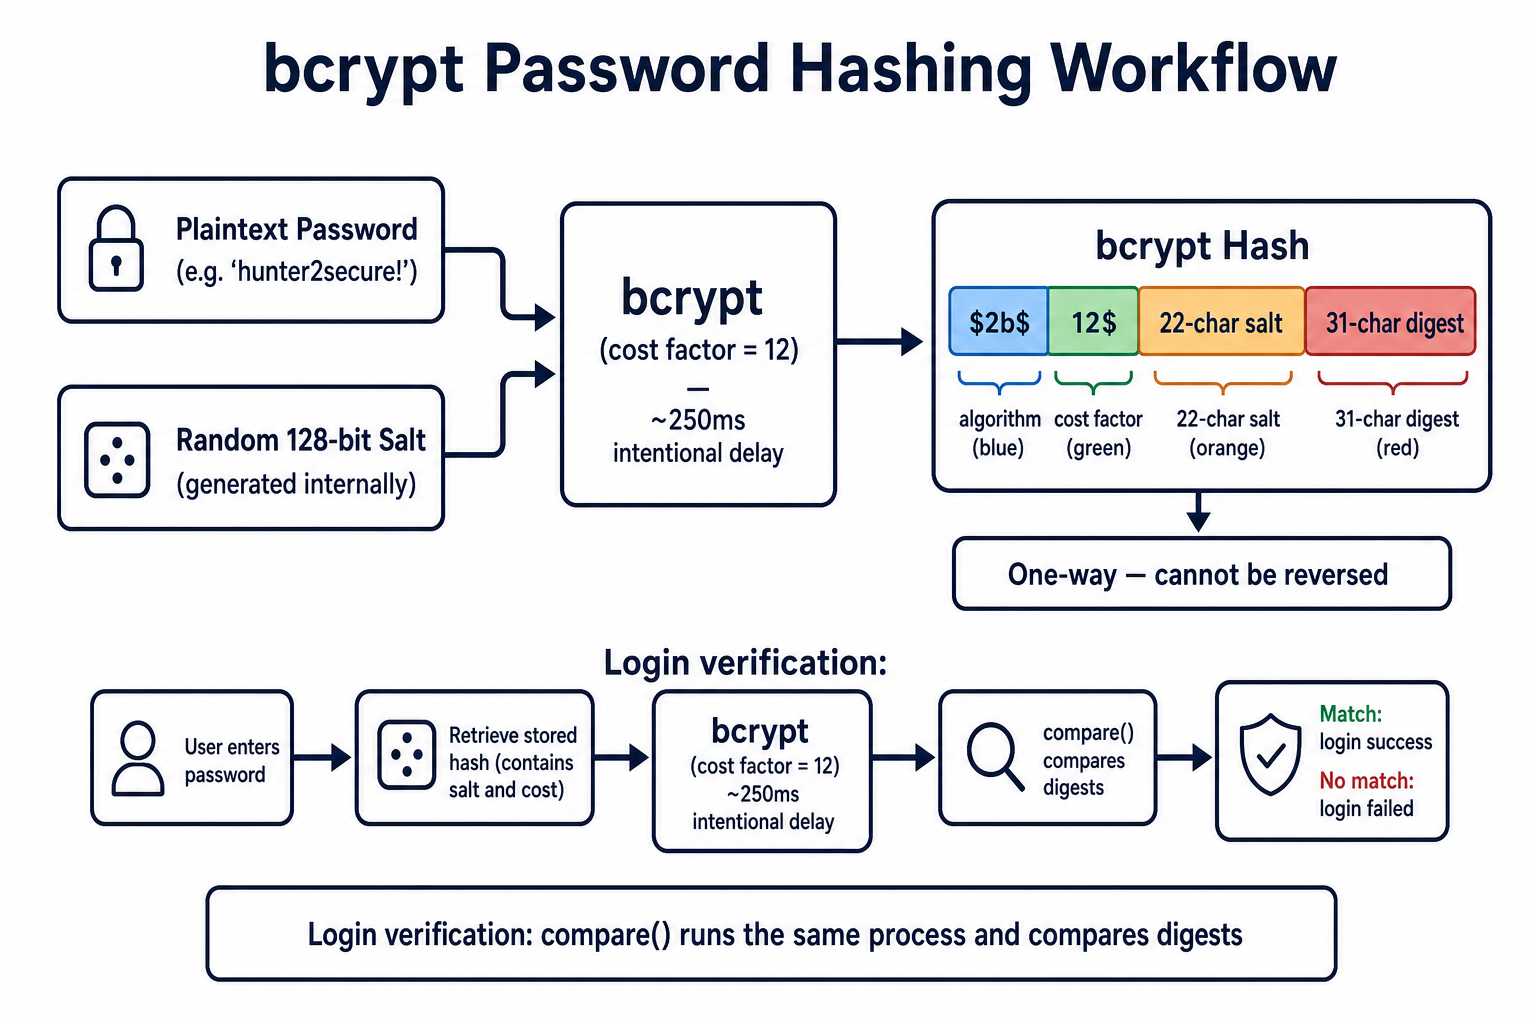
bcrypt is a password hashing function designed in 1999 by Niels Provos and David Mazières. It has three properties that make it suitable for passwords:
Intentionally slow — a configurable cost factor (work factor) controls how many iterations are run. Doubling the cost factor doubles the time, keeping pace with hardware improvements.
Built-in salting — a random 128-bit salt is generated per-password and embedded in the output hash. Two identical passwords produce different hashes, defeating rainbow table attacks.
Fixed-length output — the 60-character output string contains the algorithm version, cost factor, salt, and digest all in one portable blob.
The bcrypt output looks like:
$2b$12$LQv3c1yqBWVHxkd0LHAkCOYz6TtxMQJqhN8/lewdBdXWT/TIufSxa
 ^  ^  ^^^^^^^^^^^^^^^^^^^^^^^^^^^^^^^  ^^^^^^^^^^^^^^^^^^^^
algo cost        22-char salt               31-char digest
Implementing bcrypt in Node.js
Below is a production-quality user registration and login service using bcryptjs.
// auth.service.js
import bcrypt from 'bcryptjs';
import { db } from './database.js';

const BCRYPT_ROUNDS = 12; // ~250ms on a modern server — tune per hardware

/**
 * Register a new user, storing only the bcrypt hash.
 */
export async function registerUser(email, plainTextPassword) {
  // 1. Validate password strength before hashing
  if (plainTextPassword.length < 12) {
    throw new Error('Password must be at least 12 characters.');
  }

  // 2. Hash — bcrypt.hash() auto-generates a unique salt internally
  const passwordHash = await bcrypt.hash(plainTextPassword, BCRYPT_ROUNDS);

  // 3. Persist — never store plainTextPassword
  const user = await db.query(
    'INSERT INTO users (email, password_hash) VALUES ($1, $2) RETURNING id, email',
    [email.toLowerCase().trim(), passwordHash]
  );

  return user.rows[0];
}

/**
 * Verify a login attempt. Returns the user or null.
 */
export async function verifyLogin(email, plainTextPassword) {
  const result = await db.query(
    'SELECT id, email, password_hash, is_active FROM users WHERE email = $1',
    [email.toLowerCase().trim()]
  );

  const user = result.rows[0];

  // Always run bcrypt.compare() even if user is not found.
  // This prevents timing attacks from revealing valid email addresses.
  const dummyHash = '$2b$12$invalidhashpaddingtomatchlength000000000000000000000000';
  const hashToCompare = user ? user.password_hash : dummyHash;

  const passwordMatch = await bcrypt.compare(plainTextPassword, hashToCompare);

  if (!user || !passwordMatch || !user.is_active) {
    return null;
  }

  return { id: user.id, email: user.email };
}
Warning: Never short-circuit the
bcrypt.compare()call when a user is not found. Returning early creates a measurable timing difference that lets attackers enumerate valid email addresses through response time.
Password Hashing Best Practices
| Practice | Reason |
|---|---|
| Use bcrypt, scrypt, or Argon2id | Intentionally slow; resistant to GPU attacks |
| Cost factor ≥ 12 for bcrypt | Target ~250–500ms on your server hardware |
| Never log plaintext passwords | Logs are often less protected than databases |
| Enforce minimum length (12+) | Length is the strongest entropy factor |
| Re-hash on login after cost upgrade | Transparently upgrade old hashes in production |
| Rate-limit login endpoints | Slow hashing helps but is not a substitute |
Authentication vs. Authorization
These two words are used interchangeably in casual conversation and precisely in security engineering. Getting them confused leads to serious bugs.
Authentication (AuthN): Verifying who a user is. "This request is from Alice."
Authorization (AuthZ): Determining what a verified user may do. "Alice may read invoices but not delete them."
A system can fail at either layer independently:
A broken authentication system lets the wrong person in (no lock on the door).
A broken authorization system lets the right person do the wrong things (no rooms inside the building).
In every request cycle, authentication must come before authorization — you cannot check permissions for an unknown user.
sequenceDiagram
    actor User
    participant App
    participant AuthN as Authentication Layer
    participant AuthZ as Authorization Layer
    participant Resource

    User->>App: POST /api/invoices/delete (token)
    App->>AuthN: Verify token signature & expiry
    AuthN-->>App: Identity: Alice, role: accountant
    App->>AuthZ: Can role=accountant DELETE invoices?
    AuthZ-->>App: Denied — accountant is read-only
    App-->>User: 403 Forbidden
Role-Based Access Control (RBAC)
The Core Model
RBAC is the most widely deployed authorization model in enterprise and SaaS applications. The model is simple:
A User is assigned one or more Roles.
A Role is a named collection of Permissions.
A Permission is a statement of what action may be performed on what resource.
You never assign permissions directly to users. You assign roles. This indirection is what makes RBAC manageable at scale — instead of auditing thousands of individual permission assignments, you audit a small set of role definitions.
Designing a Role Hierarchy
-- Schema for a SaaS project management application

CREATE TABLE roles (
    id          SERIAL PRIMARY KEY,
    name        VARCHAR(50) UNIQUE NOT NULL,  -- 'admin', 'manager', 'member', 'viewer'
    description TEXT
);

CREATE TABLE permissions (
    id       SERIAL PRIMARY KEY,
    action   VARCHAR(50) NOT NULL,   -- 'read', 'write', 'delete', 'manage_billing'
    resource VARCHAR(50) NOT NULL,   -- 'project', 'task', 'invoice', 'user'
    UNIQUE(action, resource)
);

CREATE TABLE role_permissions (
    role_id       INTEGER REFERENCES roles(id),
    permission_id INTEGER REFERENCES permissions(id),
    PRIMARY KEY (role_id, permission_id)
);

CREATE TABLE user_roles (
    user_id INTEGER REFERENCES users(id),
    role_id INTEGER REFERENCES roles(id),
    PRIMARY KEY (user_id, role_id)
);

-- Seed data: define what each role can do
INSERT INTO roles (name) VALUES ('admin'), ('manager'), ('member'), ('viewer');

INSERT INTO permissions (action, resource) VALUES
    ('read',   'project'),
    ('write',  'project'),
    ('delete', 'project'),
    ('read',   'invoice'),
    ('write',  'invoice'),
    ('manage_billing', 'invoice'),
    ('read',   'user'),
    ('write',  'user'),
    ('delete', 'user');

-- admin gets everything
INSERT INTO role_permissions
    SELECT r.id, p.id FROM roles r, permissions p WHERE r.name = 'admin';

-- manager: full project/task access, read invoices, no user management
INSERT INTO role_permissions
    SELECT r.id, p.id FROM roles r
    JOIN permissions p ON (p.resource = 'project')
    WHERE r.name = 'manager';
Enforcing RBAC in Middleware
// rbac.middleware.js
import { db } from './database.js';

/**
 * Factory that returns an Express middleware enforcing a specific permission.
 * Usage: router.delete('/projects/:id', requirePermission('delete', 'project'), handler)
 */
export function requirePermission(action, resource) {
  return async (req, res, next) => {
    const userId = req.user?.id; // set by authentication middleware
    if (!userId) return res.status(401).json({ error: 'Unauthenticated' });

    const result = await db.query(
      `SELECT 1
       FROM user_roles ur
       JOIN role_permissions rp ON rp.role_id = ur.role_id
       JOIN permissions p ON p.id = rp.permission_id
       WHERE ur.user_id = $1
         AND p.action   = $2
         AND p.resource = $3
       LIMIT 1`,
      [userId, action, resource]
    );

    if (result.rowCount === 0) {
      return res.status(403).json({
        error: `Forbidden: requires '${action}' on '${resource}'`
      });
    }

    next();
  };
}
// projects.router.js
import { Router } from 'express';
import { authenticate } from './auth.middleware.js';
import { requirePermission } from './rbac.middleware.js';
import * as ProjectController from './projects.controller.js';

const router = Router();

router.use(authenticate); // AuthN first on all routes

router.get('/',       requirePermission('read',   'project'), ProjectController.list);
router.post('/',      requirePermission('write',  'project'), ProjectController.create);
router.delete('/:id', requirePermission('delete', 'project'), ProjectController.remove);

export default router;
Tip: Cache user permission lookups in Redis with a TTL of 60–300 seconds. A permissions query on every request adds latency; role changes rarely need sub-second propagation.
Scaling RBAC
For larger applications, consider Attribute-Based Access Control (ABAC) or Relationship-Based Access Control (ReBAC) (used by Google Zanzibar). RBAC becomes unwieldy when you need statements like "Alice can edit her own projects but not others'" — that is an attribute condition, not a role condition. A pragmatic pattern is RBAC with ownership checks:
// Inside ProjectController.remove
export async function remove(req, res) {
  const project = await Project.findById(req.params.id);

  // RBAC says you can delete projects.
  // Ownership check: are you deleting YOUR project, or are you an admin?
  const isOwner = project.owner_id === req.user.id;
  const isAdmin = req.user.roles.includes('admin');

  if (!isOwner && !isAdmin) {
    return res.status(403).json({ error: 'You can only delete your own projects.' });
  }

  await project.destroy();
  res.status(204).end();
}
OAuth 2.0 Explained
The Problem OAuth Solves
Before OAuth, if a third-party app (say, a calendar app) needed access to your Google Contacts, it would ask for your Google username and password. That is catastrophically dangerous:
The third party stores your master credential.
You cannot revoke access to one app without changing your password everywhere.
The app has full access to your account, not just contacts.
OAuth 2.0 (RFC 6749) solves this with delegated authorization: you authorize a limited scope of access without ever sharing your password.
The Four Key Actors
| Actor | Role | Example |
|---|---|---|
| Resource Owner | The user who owns the data | You |
| Client | The application requesting access | A calendar app |
| Authorization Server | Issues tokens after user consent | Google's auth server |
| Resource Server | Hosts the protected data | Google Contacts API |
The Authorization Code Flow
This is the most secure OAuth 2.0 flow for server-side and modern single-page applications (with PKCE).
sequenceDiagram
    actor User
    participant Client as Calendar App (Client)
    participant AuthServer as Google Auth Server
    participant ResourceServer as Google Contacts API

    User->>Client: "Connect Google Contacts"
    Client->>AuthServer: Redirect: /authorize?client_id=...&scope=contacts.read&code_challenge=...
    AuthServer->>User: Show consent screen
    User->>AuthServer: Grants permission
    AuthServer->>Client: Redirect back with authorization_code
    Client->>AuthServer: POST /token (code + code_verifier)
    AuthServer-->>Client: { access_token, refresh_token, expires_in }
    Client->>ResourceServer: GET /contacts (Authorization: Bearer <access_token>)
    ResourceServer-->>Client: Contact list JSON
Implementing OAuth Client in Node.js
// oauth.controller.js — Authorization Code Flow with PKCE
import crypto from 'crypto';
import { URLSearchParams } from 'url';

const GOOGLE_CLIENT_ID     = process.env.GOOGLE_CLIENT_ID;
const GOOGLE_CLIENT_SECRET = process.env.GOOGLE_CLIENT_SECRET;
const REDIRECT_URI         = 'https://yourapp.com/auth/google/callback';

// Step 1: Generate PKCE verifier and challenge, redirect user to Google
export function initiateGoogleOAuth(req, res) {
  const codeVerifier  = crypto.randomBytes(64).toString('base64url');
  const codeChallenge = crypto
    .createHash('sha256')
    .update(codeVerifier)
    .digest('base64url');

  const state = crypto.randomBytes(16).toString('hex'); // CSRF protection

  // Store verifier and state in the session — server-side only
  req.session.oauthState    = state;
  req.session.codeVerifier  = codeVerifier;

  const params = new URLSearchParams({
    client_id:             GOOGLE_CLIENT_ID,
    redirect_uri:          REDIRECT_URI,
    response_type:         'code',
    scope:                 'openid email profile',
    state,
    code_challenge:        codeChallenge,
    code_challenge_method: 'S256',
    access_type:           'offline', // request refresh_token
  });

  res.redirect(`https://accounts.google.com/o/oauth2/v2/auth?${params}`);
}

// Step 2: Handle the callback, exchange code for tokens
export async function handleGoogleCallback(req, res) {
  const { code, state } = req.query;

  // Validate CSRF state
  if (state !== req.session.oauthState) {
    return res.status(400).json({ error: 'Invalid OAuth state' });
  }

  const tokenResponse = await fetch('https://oauth2.googleapis.com/token', {
    method: 'POST',
    headers: { 'Content-Type': 'application/x-www-form-urlencoded' },
    body: new URLSearchParams({
      grant_type:    'authorization_code',
      code,
      redirect_uri:  REDIRECT_URI,
      client_id:     GOOGLE_CLIENT_ID,
      client_secret: GOOGLE_CLIENT_SECRET,
      code_verifier: req.session.codeVerifier,
    }),
  });

  const tokens = await tokenResponse.json();
  // tokens = { access_token, id_token, refresh_token, expires_in, token_type }

  // Store tokens securely — access_token in memory/session,
  // refresh_token in encrypted DB column
  req.session.accessToken = tokens.access_token;

  res.redirect('/dashboard');
}
Warning: Never store access tokens in
localStorage. They are accessible to any JavaScript on the page, making them vulnerable to XSS attacks. UseHttpOnly,Secure,SameSite=Laxcookies or server-side sessions.
OpenID Connect (OIDC)
What OIDC Adds to OAuth 2.0
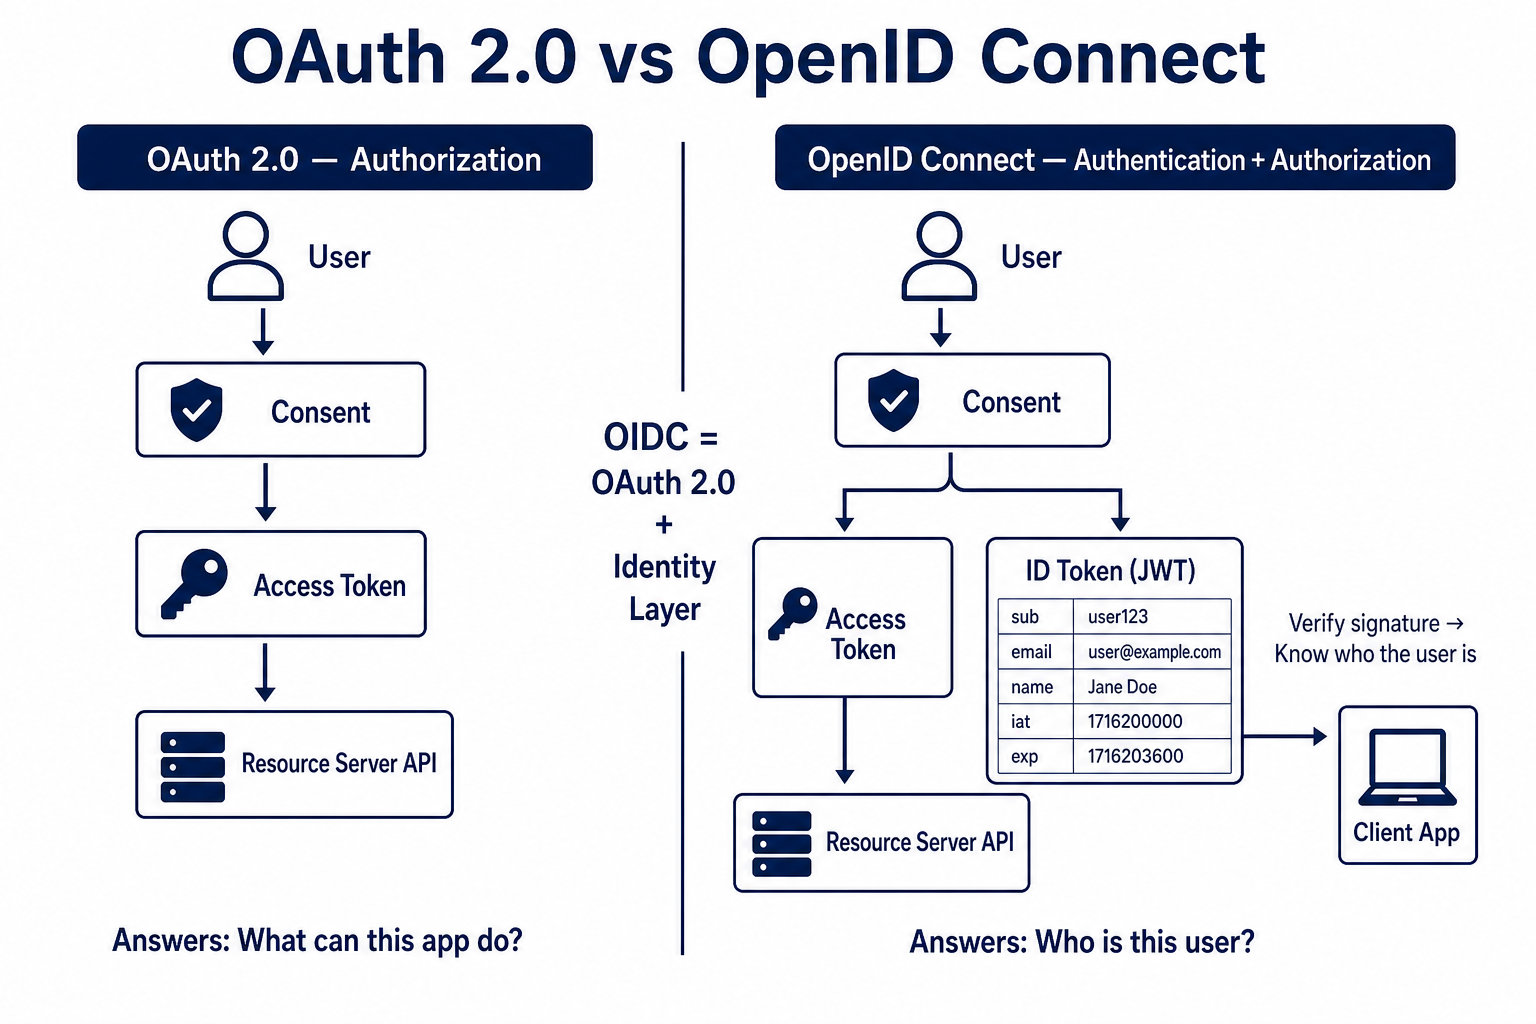
OAuth 2.0 was designed for authorization — granting access to resources. It deliberately says nothing about the user's identity. The access_token tells the resource server "this request is allowed" but does not reliably tell the client application who the user is.
OpenID Connect is a thin identity layer built on top of OAuth 2.0 (published as a spec by the OpenID Foundation in 2014). It adds:
ID Token — a signed JWT that contains claims about the authenticated user (
sub,email,name,picture,iat,exp).UserInfo Endpoint — an API endpoint that returns additional user claims using the access token.
Standard scopes —
openid,profile,email,address,phone.Discovery document —
/.well-known/openid-configurationexposes all endpoint URLs, allowing dynamic client configuration.
Decoding an ID Token
The ID token is a three-part base64-encoded JWT:
<base64url(header)>.<base64url(payload)>.<base64url(signature)>
Decoded payload example from Google:
{
  "iss": "https://accounts.google.com",
  "azp": "your-client-id.apps.googleusercontent.com",
  "aud": "your-client-id.apps.googleusercontent.com",
  "sub": "108521490152936476488",
  "email": "alice@example.com",
  "email_verified": true,
  "name": "Alice Nakamura",
  "picture": "https://lh3.googleusercontent.com/...",
  "given_name": "Alice",
  "family_name": "Nakamura",
  "iat": 1716400000,
  "exp": 1716403600
}
Validating an ID Token
Never trust an ID token without verification. You must:
Verify the signature against the issuer's public keys (fetched from
jwks_uriin the discovery document).Confirm
audmatches yourclient_id.Confirm
issmatches the expected provider.Confirm
expis in the future.
// oidc.verify.js
import { createRemoteJWKSet, jwtVerify } from 'jose';

const GOOGLE_JWKS_URI = 'https://www.googleapis.com/oauth2/v3/certs';
const GOOGLE_ISSUER   = 'https://accounts.google.com';
const CLIENT_ID       = process.env.GOOGLE_CLIENT_ID;

// Cache the JWKS remotely — jose handles key rotation automatically
const googleJWKS = createRemoteJWKSet(new URL(GOOGLE_JWKS_URI));

export async function verifyIdToken(idToken) {
  try {
    const { payload } = await jwtVerify(idToken, googleJWKS, {
      issuer:   GOOGLE_ISSUER,
      audience: CLIENT_ID,
    });

    // payload is now a verified, typed object
    return {
      userId:        payload.sub,
      email:         payload.email,
      emailVerified: payload.email_verified,
      name:          payload.name,
      picture:       payload.picture,
    };
  } catch (err) {
    // jwtVerify throws on any validation failure
    throw new Error(`ID token verification failed: ${err.message}`);
  }
}
Modern Authentication Architecture
Single Sign-On (SSO)
In enterprise environments, users should authenticate once and access all internal applications without re-entering credentials. This is SSO, typically implemented via OIDC or SAML 2.0 with a central Identity Provider (IdP) like Okta, Azure AD, or Auth0.
flowchart LR
    User([User])
    IdP[(Identity Provider\nOkta / Auth0)]
    AppA[CRM App]
    AppB[HR Portal]
    AppC[Dev Tools]

    User -->|1. Access CRM| AppA
    AppA -->|2. Redirect to IdP| IdP
    IdP -->|3. Authenticate user once| User
    IdP -->|4. Issue ID + Access Tokens| AppA
    User -->|5. Access HR Portal| AppB
    AppB -->|6. Check existing SSO session| IdP
    IdP -->|7. Token already valid — silent auth| AppB
    User -->|8. Access Dev Tools| AppC
    AppC -->|9. Same silent flow| IdP
Token Lifecycle
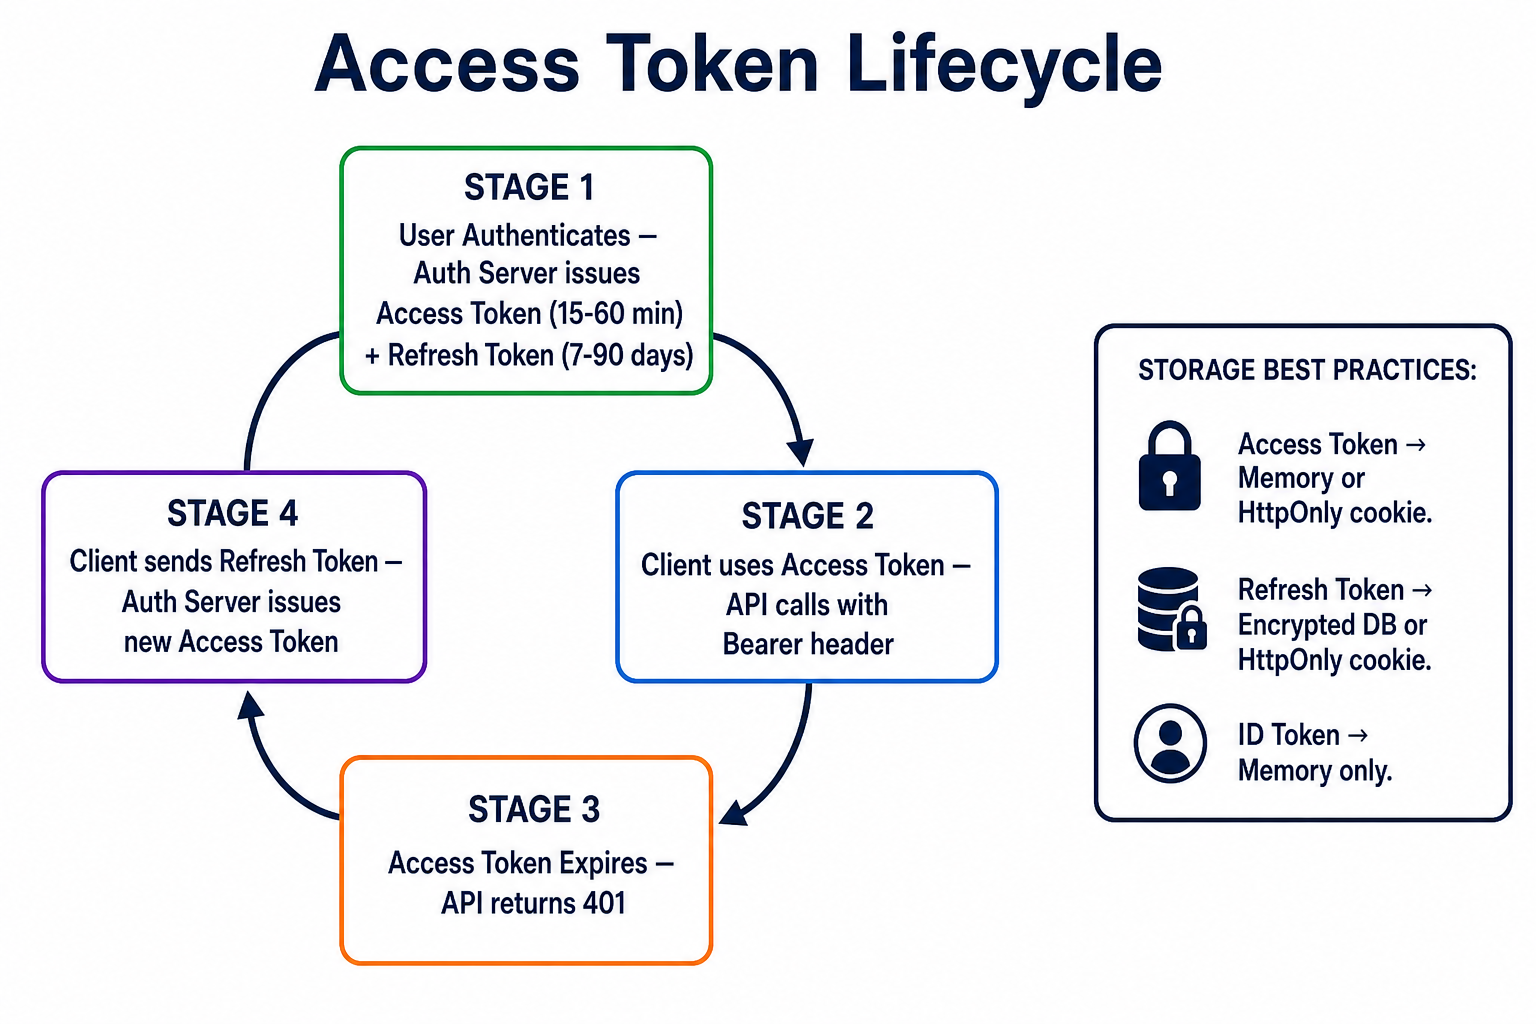
Access tokens are short-lived (typically 15–60 minutes). Refresh tokens are long-lived (days to months) and are used to obtain new access tokens without user interaction.
| Token Type | Storage | Lifetime | Purpose |
|---|---|---|---|
| Access Token | Memory / HttpOnly cookie | 15–60 minutes | API authorization |
| Refresh Token | Encrypted DB / HttpOnly cookie | 7–90 days | Obtain new access tokens |
| ID Token | Memory only | 1 hour | Identity claims for the client app |
| Session Token | Server-side session store | Variable | Traditional web session |
Trade-offs and Pitfalls
| Approach | When to Use | When to Avoid |
|---|---|---|
| bcrypt cost 10 | Low-traffic apps, old hardware | High-traffic auth endpoints (use 12 + caching) |
| Simple RBAC | Most SaaS apps | When permissions depend on data relationships |
| OAuth Authorization Code + PKCE | All user-facing apps | Machine-to-machine (use Client Credentials flow) |
| Self-hosted OIDC | Full control needed | Limited security team — use managed IdP instead |
| JWT access tokens | Stateless microservices | Revocation is required immediately (use opaque tokens + introspection) |
Common Pitfalls
Storing the JWT secret in code: Rotate immediately if leaked; use environment variables and secret managers.
Not validating
audin ID tokens: An ID token issued to App A can be replayed against App B.Trusting client-supplied roles: Always derive roles from your database, never from the JWT alone unless you control and trust the issuer.
Forgetting token revocation: When a user changes their password or is deactivated, short-lived JWTs are still valid until expiry. Implement a token deny-list or reduce TTL.
Logging authorization failures without rate limiting: 403 storms can indicate an enumeration attack; alert on them.
Security Best Practices
Enforce strong passwords at registration — minimum 12 characters, check against
HaveIBeenPwnedAPI for known-breached passwords.Implement MFA — TOTP (Google Authenticator) or WebAuthn passkeys add a second factor that passwords alone cannot provide.
Always use HTTPS — tokens in transit are only as secure as the transport layer.
Apply the principle of least privilege — default to the most restrictive role and escalate only when needed.
Rotate secrets regularly — rotate signing keys quarterly; automate it with tools like AWS Secrets Manager.
Rate-limit authentication endpoints — 5 failed attempts per 15 minutes per IP and per account.
Audit log security events — login, logout, role changes, permission denials, password resets. Store logs in an append-only system.
Keep bcrypt cost factor current — re-evaluate annually; double it every time hardware doubles in speed.
Use managed identity providers for new projects — Auth0, Cognito, and Clerk handle key rotation, MFA, compliance, and attack detection. Build your own only when you have dedicated security engineers.
Test your authorization boundaries — write integration tests that explicitly verify 403 responses, not just 200 responses.
# Quick check: does your app return 403 (not 200 or 500) for unauthorized access?
curl -s -o /dev/null -w "%{http_code}" \
  -H "Authorization: Bearer <low_privilege_token>" \
  https://yourapi.com/admin/users
# Expected output: 403
Conclusion
Security is not a feature you add at the end — it is the foundation every other feature depends on. The mental model to carry forward:
Hash passwords with bcrypt (cost ≥ 12) and never store plaintext or weakly hashed credentials.
Authenticate before you authorize: confirm identity first, then check permissions.
RBAC scales from two roles to hundreds if you maintain the indirection between users, roles, and permissions.
OAuth 2.0 solves delegated authorization — third-party apps get scoped access tokens, never your master credentials.
OpenID Connect solves identity on top of OAuth — the ID token tells your app who the user is, and you must verify its signature.
In production, combine all of these: bcrypt for your own credential store, OIDC for social/enterprise login, RBAC for fine-grained access control, and short-lived access tokens with rotation.
Your next concrete step: audit one of your existing applications against this checklist. Pick the highest-risk gap — probably password storage or missing authorization checks — and fix it this week.
Further Reading
OWASP Authentication Cheat Sheet —
owasp.org/cheat-sheets/Authentication_Cheat_Sheet.html— Comprehensive, production-tested guidance.RFC 6749 — The OAuth 2.0 Authorization Framework —
datatracker.ietf.org/doc/html/rfc6749— The canonical spec, readable in an afternoon.OpenID Connect Core 1.0 —
openid.net/specs/openid-connect-core-1_0.html— Full OIDC specification.Have I Been Pwned API —
haveibeenpwned.com/API/v3— Check passwords against 12+ billion breached credentials.The bcrypt paper (1999) — Provos & Mazières, "A Future-Adaptable Password Scheme" — Understanding the design intent behind bcrypt.